Friday, 23 March 2012

Roof Insulation


  There are several different methods we could use to insulate the house at roof level. Here  the trussed rafters are 200mm deep which accommodate 175mm of PIR board insulation, laid in two layers. The insulation is installed between each rafter and flush with the lower edge of the rafters. A 25mm air gap has been maintained above. Rafter level insulation is typically used in ‘warm’ roof construction. A degree of thermal or cold bridging occurs through the rafters because the heat conductivity of any timber is much higher than PIR board  meaning that heat will be transmitted through 200mm thick timber much more quickly than through PIR board of equal thickness. Potential cold bridging can be reduced by having a third continuous layer of insulating material either below or above the rafters. Any joints between the PIR boards are taped as within the cavity wall.

   Insulation within the rafters is only continued up to ceiling height. Above and between the ceiling ties 300mm of mineral wool insulation will be laid, again in multiple layers, with the thickest being applied as a continuous layer over the top. Although mineral wool is not as effective as PIR board, it still offers high level of insulation at this thickness. Where the two types of insulation meet it is important to try and eliminate any gaps, either with staggered taped joints or by further packing of mineral wool.

   Any remaining attic voids above the insulation are classed as ‘cold’ roof areas and are ventilated to eliminate risk of condensation. In this case ample ventilation is afforded via special tiles that are installed in the roof to maintain access for bats into a protected bat loft.


The inner structure reaches the ground floor ceiling height.

The first floor joists can now be fixed in place.

With the first floor underway, work on the cavity walls continues.


Tuesday, 13 March 2012

Cavity Wall Insulation

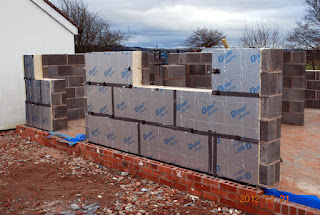
Because we are using a traditional cavity wall construction and not something like SIPs (Sandwiched Insulated Panels), we have used an extra wide cavity, this is in order to accommodate a more effective thickness of insulation. With a cavity width of 200mm we are able to install 150mm of PIR insulation, retaining a 50mm air gap. The effectiveness of any rigid insulation is reduced at joints, so two 75mm layers have been used rather than a single layer. Using two layers allows us to stagger the vertical joints where each PIR board abuts with another within the cavity.  All remaining exposed joints are then taped, this also greatly  minimizes any air leakage.


We have


calculated that this cavity wall specification will achieve a ‘U’ value much lower than required by legislation, being almost twice as effective at reducing heat loss. PIR board insulation can also be used to line walls internaly or externaly. This may be used as a solution for insulating solid walls or timber frame structures.


A 200mm cavity requires the use of extra long wall ties which tie the inner and outer block skins together. Various types of extra long wall tie are now available. Here we are using basalt fibre based ties, which have very low thermal conductivity, this further reduces potential cold bridging.


Monday, 12 March 2012

Ground Floor Insulation


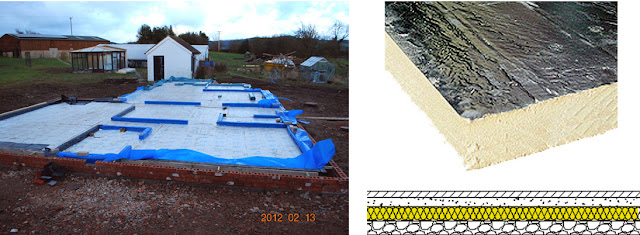
To insulate the ground floor we have used 150mm thick Polyisocyanurate insulation, this reduces heat loss through the floor by almost double the mandatory target. Polyisocyanurate or (PIR) insulation has an almost unmatched level of thermal resistance and today is commonly specified in a wide variety of applications. Although ‘man made’, much of the raw component is recycled content, PIR board has zero ozone depletion potential and virtualy no global warming potential.


Highlighted in the detail above and shown in the photograph is a load bearing insulating element which is laid at low level as part of the cavity wall inner skin, this is used to prevent  ‘cold bridging’, essentialy this  greatly reduces potential heat loss through the internal blockwork to maintain a very low overall ‘U’ value. The ‘U’ value is the rate of thermal transmittance and when calculated takes into account the gauge or thickness of  the material. The load bearing insulating element we have used is similar to PIR board but with a much higher compressive strength.


Thursday, 1 March 2012

Anatomy of Thermal Efficiency


In order to maintain a very low level of heat loss we form a near unbroken barrier or envelope of  insulation around the building. Insulation is laid at ground floor level, applied to or set within the external walls and installed at roof level. We also apply insulation between floors and within internal partitions. Below is one of the typical sections from our detailed drawings. Our detailed drawings show sections through the building at different points to show detailed elements of the structure. The details are accompanied by notes which specify the materials, dimensions and other relevant information for both building control and contractors. 


  In the following posts we will give an overview of some of the main areas of importance with regard to providing solutions for whole house insulation, and also highlight the materials and techniques we will be employing to achieve a high standard of thermal efficiency.     


With foul drains pre-laid the internal walls are built up to floor level. 

A sand blinding layer is laid over the level fill of compressed hardcore.

With the damp proof membrane laid the ground floor insulation is cut and fitted to suit.

Another protective layer of  D.P.M is laid before the floor slab is poured and leveled.

With the slab now dry, work begins on the inner block skin.

Work continues on the ground floor block partitioning.

All joints between the thick slabs of insulation are taped and sealed. 

The build climbs towards the first floor.